iOS gives us a ton of great capabilities to build upon. Being able to use the user's current geographic location in our apps really has changed the world.
We always need to ask for the user's permission first though, so we might as well do it in style! Today we'll check out a simple yet beautiful library from Sven Tiigi called STLocationRequest that uses Flyover to provide a great looking "location access prompt" view controller.
We'll begin by importing STLocationRequest, and configuring and showing a location request controller.
MKDirections and MKDirectionsRequest are the classes we use to retrieve directions between two locations. They also make it very easy to display the resulting directions route on a map. Let's dive in:
Setup Directions Request
Note: Off camera, we have let the user input a keyword search String, then geocoded it into an MKPlacemark object called placemark.
letrequest=MKDirectionsRequest()request.source=MKMapItem.mapItemForCurrentLocation()letdestination=MKPlacemark(coordinate:placemark.location.coordinate,addressDictionary:nil)request.destination=MKMapItem(placemark:destination)letd=MKDirections(request:request)d.calculateDirectionsWithCompletionHandler{response,erroringuardletroute=response?.routes.firstelse{return}// we'll do this bit next}
MKLocalSearch is a wonderful little gem hidden inside MapKit. It allows an app to perform a natural language query for local points of interest near a given latitude and longitude. Today we'll use it to build a simple app to find us a place to eat lunch.
manager=CLLocationManager()manager!.delegate=selfmanager!.desiredAccuracy=kCLLocationAccuracyThreeKilometersmanager!.requestWhenInUseAuthorization()manager!.requestLocation()// then later, once we have a location:letrequest=MKLocalSearchRequest()request.naturalLanguageQuery="Restaurants"request.region=MKCoordinateRegionMakeWithDistance(location.coordinate,1600,1600)MKLocalSearch(request:request).startWithCompletionHandler{(response,error)inguarderror==nilelse{return}guardletresponse=responseelse{return}guardresponse.mapItems.count>0else{return}letrandomIndex=Int(arc4random_uniform(UInt32(response.mapItems.count)))letmapItem=response.mapItems[randomIndex]mapItem.openInMapsWithLaunchOptions(nil)}
First we set up our CLLocationManager, and use the new iOS 9 method for requesting a “single location” instead of continuous updates.
Then we create the MKLocalSearchRequest object and tell it to search "Restaurants" within 1600 meters (about a mile) of the user's current location.
After that it's just a matter of waiting for results, choosing one at random, and then we cheat a bit (since this is just a demo) and pop the user out to the Maps app to view the chosen result.
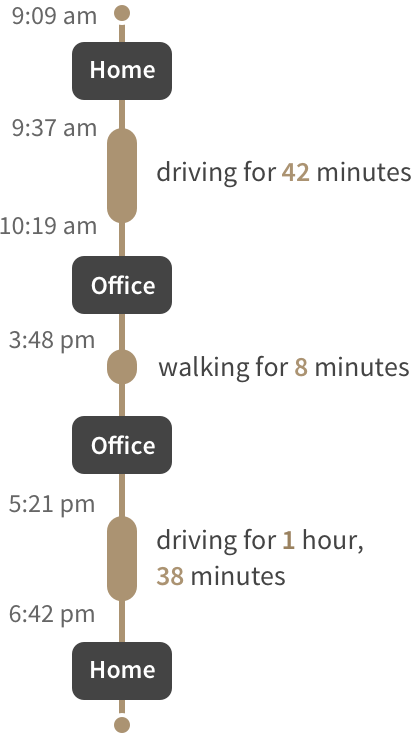
Starting in iOS 8 you can retrieve the places users visit.
classChauffeur:CLLocationManagerDelegate{varmanager:CLLocationManagerfuncstart(){manager.startMonitoringVisits()}funcstop(){manager.stopMonitoringVisits()}// MARK: - CLLocationManagerDelegatefunclocationManager(manager:CLLocationManager!,didVisitvisit:CLVisit!){ifvisit.departureDate.isEqualToDate(NSDate.distantFuture()as!NSDate){// A visit has begun, but not yet ended. User must still be at the place.}else{// The visit is complete, user has left the place.}}}
CLVisit can and does deliver interesting results, but it’s not a slam-dunk yet. Best to use it for journaling-style features, or when it’s okay if it’s not always perfectly accurate. That being said, I tried it out, and was surprised how well it did.