When using UIImageViews, sometimes the built-in content modes can cramp our style.
Many times, we're displaying photos of people. In these cases, it'd be great if the image view could somehow be told to intelligently crop the photo around the person's face.
AspectFillFaceAware is essentially just an extension on UIImageView. It provides two ways to configure an image view to be "face aware".
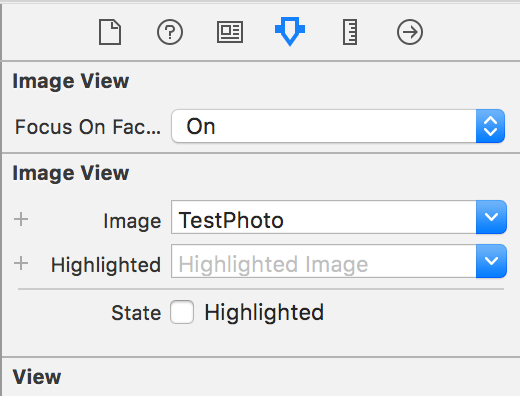
The first is in Interface Builder, we can enable the feature by flipping on the feature in the Inspector. (Not seeing the option? Run your project once, then it should appear).
Here's the how it looks:
We can also enable the functionality in code by setting the image view'simage using this new function:
imageView.set(image:avatar,focusOnFaces:true)
We can even throw a quick corner radius on the image view'slayer to try out the "face aware" functionality on a circular view. (i.e. user avatars):
Under the hood, the library is using a low accuracy CIDetector with a type of CIDetectorTypeFace to handle the actual face detection. Want to dive deeper here? We covered CIDetectors way back in Bite #87.
More info about AsyncFillFaceAware can be found at git.io/faceaware
We've looked at allowing users to capture or choose images for use in our apps a couple times here. We learned about UIImagePickerController in Bite #83 and then ImagePicker in Bite #157.
Today we've got a new contender in this space called Fusuma. It's by Yuta Akizuki and aims to provide a very full-featured drop-in solution for this task. Let's try it.
We'll start by presenting the main FusumaViewController:
In Bite #101 we started working on a custom camera view controller.
Today we'll complete it by adding a way for users to capture a photo and do something with it. We'll start by making it easy to use. We'll make the whole screen a capture button by adding a tap gesture recognizer to our view:
We looked at allowing our users to capture photos/videos using UIImagePickerController in Bite #83. Now we'll take things to the next level by starting to create our own customcamera view controller. Today we'll get all the plumbing wired up and get the preview on the screen. Let's get started.
We'll start with the "single view" template in Xcode. There are a number of different objects we'll need to setup and glue together, so we'll go into our view controller and add a function called setupSession. We'll call this in viewWillAppear(animated:).
First we'll instantiate an AVCaptureSession. It's sort of the central hub of all this. We can configure it with a number of different presets. We'll use a preset for taking high quality still photos. Now, our session needs some inputs and outputs.
We'll use defaulDeviceWithMediaType and pass in Video to get the default hardware device for capturing and recording images on the user's device (usually the the back camera). Then we'll try to create an AVCaptureDeviceInput from the device. Next up, an output.
Capture sessions can return us data in all sorts of interesting ways: Still images, videos, raw pixel data, and more. Here we'll set up an AVCaptureStillImageOutput and ask it for JPEG photos. We'll do one more safety check then add both our input and output to our session.
Finally, let's display our camera so the user can see what they're photographing.
We'll pass our session into a new AVCapturePreviewLayer and add it to our view. Then we just need to start the session. If we run the app we'll see it's starting to look like a camera, neat!
Tomorrow, we'll finish up by adding the ability to actually capture some photos.
UIImagePickerController has been part of iOS since it's first release and it's evolved quite a bit over the years. Let's take a look at what it can do:
Capture images and videos
Choose images and videos from the Photos library
Crop images after choosing/capturing
Trim videos after choosing/capturing
Whew! That's quite a bit of functionality packed into this one class.
We can't cover all of that in this Bite, instead let's look at a simple example use case. We'll be letting our users take a photo, crop it, and then show how to access it for use in our app.
The first step is to find out the device we're running on has a camera, can take photos. Then we'll configure the UIImagePickerController and present it.
Then we'll add a function from UIImagePickerControllerDelegate where we'll get a userInfodictionary. We'll use the values inside to extract the captured image in either it's original or cropped form. We can also access a few other details, like the cropped rect as a CGRect or the image's metadata as a dictionary.
Note that we'll need to declare conformance to the UINavigationControllerDelegate protocol since UIImagePickerController is actually a subclass of UINavigationController under the hood.
PINRemoteImage is a new and promising solution for asynchronously downloading images. It was created by the team at Pinterest and has been battle tested in their extremely popular iOS app. Let's import PINRemoteImage, take a look at how to use it, and see what it can do:
Images are downloaded and decoded off the main thread. They're then cached using a fast, non-deadlocking parallel object cache. (Courtesy of another Pinterest library, PINCache). Upon subsequent requests the in-memory, then disk caches will be checked before re-downloading.
Processing
You can process the image before caching occurs. Here we'll use Toucan (covered in Bite #40) to convert the image into a circular avatar.
Optionally, you can enable a mode supporting progressive JPEG images. They're treated with a nice blur effect, so they look great even at low resolutions.
imageView.updateWithProgress=true
Animated GIF Support
PINRemoteImage also comes with built-in support for Flipboard's blazing fast animated GIF library, FLAnimatedImage. All you have to do to use it is create an FLAnimatedImageView instead of a UIImageView:
Whether you're applying a circular crop to user avatars or just resizing a photo downloaded from a web service, processing images can be a bit of a chore. Toucan is a Swift image processing library from Gavin Bunney that makes working with images a breeze.
Let's import Toucan and take a look at what it can do:
Resize Images
// userAvatar is a UIImage downloaded from the networkletresizedAvatar=Toucan.Resize.resizeImage(myImage,size:CGSize(width:100,height:100))
Toucan provides another syntax for chaining different processing steps together. Just call .image at the end to get a final processed UIImage. Here we can also see how to apply a 1 point wide border to the final image.
CoreImage has long been a staple on OS X, and was added to iOS a few years ago. It's an incredibly feature-packed image processing API that can apply just about any type of filter or image manipulation you can dream of. Let's take a look at applying a simple color tint to an image:
CoreImage works on CIImages not UIImages, so we convert our image to a CIImage, and use guard since the CIImage property on UIImage is optional. CoreImage also doesn't use UIColor, so we create a CIColor instead.
Then the fun part, we create our filter by name. CoreImage has literally 100's of different filters available, and instead of subclasses, you instantiate them by name.
CIFilters also don't have explicit class properties, you instead supply values for "Input Parameters" on your filter.
Lastly, we apply the filter by simply asking for it's outputImage.