Today we'll look at a new library from Krzysztof Zabłocki called KZFileWatchers. It allows us to easily monitor local and remote files, running code when changes occur. Let's dive in.
Watching files for changes is a common technique used when creating "live" updating interfaces.
This is a popular technique among web developers. For example, it's now common to use a tool to "live reload" a web page whenever a CSS file is changed.
Live updating techniques can dramatically change how we work, allowing us to try out changes more rapidly.
KZFileWatchers helps us build this type of functionality by providing two simple tools:
FileWatcher.Local is for observing local file changes. (It can even cross sandbox boundaries for debug simulator builds, think "config files on the desktop").
FileWatcher.Remote is for observe remote file changes. We can place a file on a server somewhere, and KZFileWatchers will use the Etag headers and Last-Modified-Date. This even works with Dropbox. Neat.
Let's use a FileWatcher.Local to make a live updating label.
First we'll create a label:
lettextLabel=UILabel()
Then we'll create our file if it doesn't already exist:
We can use this technique to drive all sorts of systems. With this we can easily enable/disable features, change content of labels in our UI, or build a full fledged theming system that updates in "real time".
When using UIImageViews, sometimes the built-in content modes can cramp our style.
Many times, we're displaying photos of people. In these cases, it'd be great if the image view could somehow be told to intelligently crop the photo around the person's face.
AspectFillFaceAware is essentially just an extension on UIImageView. It provides two ways to configure an image view to be "face aware".
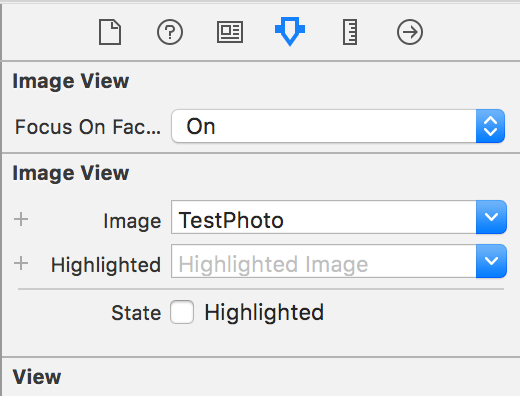
The first is in Interface Builder, we can enable the feature by flipping on the feature in the Inspector. (Not seeing the option? Run your project once, then it should appear).
Here's the how it looks:
We can also enable the functionality in code by setting the image view'simage using this new function:
imageView.set(image:avatar,focusOnFaces:true)
We can even throw a quick corner radius on the image view'slayer to try out the "face aware" functionality on a circular view. (i.e. user avatars):
Under the hood, the library is using a low accuracy CIDetector with a type of CIDetectorTypeFace to handle the actual face detection. Want to dive deeper here? We covered CIDetectors way back in Bite #87.
More info about AsyncFillFaceAware can be found at git.io/faceaware
With all the WWDC excitement recently, it might have been easy to miss a wonderful new library release from the fine folks at Lickability. It's called PinpointKit and it can completely transform how we collect feedback from users testing our apps. Let's check it out!
After integrating PinpointKit into our app via CocoaPods/Carthage, or just manually, we can trigger a new bug report like this:
We're provided a Configuration struct where we can customize the look and feel, and a PinpointKitDelegate to hook into the state of the feedback being sent.
Now, whenever a user reports a bug they'll be able to:
Send along system logs automatically (opt-in)
Add arrows, boxes, and text to screenshots
Redact sensitive info before reporting
By default PinpointKit reports via Email, but this, (and just about everything else) is completely customizable.
In Bite #231, we took a look at Realm's new Fine-grained notifications functionality. Today we'll build upon this by checking out another new Realm feature: Queryable, Live Inverse Collections. Whew! That's a fancy name. This feature deserves one though, let's check it out.
Here's a Realm object with a relationship defined on it:
That dogsproperty can be used in a query, and it will even stay updated to reflect changes to the property's value made elsewhere in our app, automatically.
None of that is new though. What is new is the inverse of this mechanic.
LinkingObjects are live and auto-updating. When new relationships are formed or removed, they will update to reflect the new state.
LinkingObjects can be used In queries, natively. (Previously this would need to be done in our code):
// People that have a child that have a parent named Diane.realm.objects(Person).filter("ANY children.parents.name == 'Diane'")// People whose parents have an average age of > 65.realm.objects(Person).filter("parents.@avg.age > 65")
LinkingObjects behave like regular Realm collections:
// Which of my parents are over the age of 56?self.parents.filter("age > 56")// Calculate the age of my parents.self.parents.average("age")
Animation plays a key role in how we understand the user interfaces in the software we use. This role expands itself when animations are driven directly from a user's gestures or interactions with the interface. Today we'll look at a new framework that can help us create these types of experiences without breaking a sweat. Let's dive in.
As the project's README puts it: "all animation is the interpolation of values over time."
Interpolate helps us describe the relationships that we want to exist between a user's gesture and the interpolated values that should result for the properties of our views. Let's try it by animating a color.
Since Pan GRs report every step of their progress as a simple float (from 0.0 - 1.0), we can simply set that progress percentage value directly on the Interpolate object.
There's tons more too, Interpolate supports easing functions, and works on all sorts of foundation types (points, rects, colors, etc.).
We first looked at Realm way back in Bite #49. It's a great data storage solution for our mobile apps. Today we'll start looking at some of the latest improvements in Realm and the new capabilities they offer. First up is Fine-grained notifications. Let's dive in:
Realm has offered notifications of write operations for a while, they look like this:
These are still around and work great, but it might help to know more about what changed. That's where the new Collection Notifications come in.
Collection notifications give us access the changes that just occurred at a fine-grained level, including the specific indices of insertions, deletions, etc
.Update's values can be easily mapped to NSIndexPath objects suitable for use in table views and collection views.
Here's a complete example showing all of this in action:
classSpaceshipsViewController:UITableViewController{varnotificationToken:NotificationToken?=niloverridefuncviewDidLoad(){super.viewDidLoad()letrealm=try!Realm()letresults=realm.objects(Spaceships).filter("maxSpeed > 0")// Observe Results NotificationsnotificationToken=results.addNotificationBlock{[weakself](changes:RealmCollectionChange)inguardlettableView=self?.tableViewelse{return}switchchanges{case.Initial:// Results are now populated and can be accessed without blocking the UItableView.reloadData()breakcase.Update(_,letdeletions,letinsertions,letmodifications):// Query results have changed, so apply them to the UITableViewtableView.beginUpdates()tableView.insertRowsAtIndexPaths(insertions.map{NSIndexPath(forRow:$0,inSection:0)},withRowAnimation:.Automatic)tableView.deleteRowsAtIndexPaths(deletions.map{NSIndexPath(forRow:$0,inSection:0)},withRowAnimation:.Automatic)tableView.reloadRowsAtIndexPaths(modifications.map{NSIndexPath(forRow:$0,inSection:0)},withRowAnimation:.Automatic)tableView.endUpdates()breakcase.Error(leterror):// An error occurred while opening the Realm file on the background worker threadfatalError("\(error)")break}}}deinit{notificationToken?.stop()}}
When it comes to using Markdown on iOS and OS X, there's tons of options. Today we'll look at one popular solution from Simon Fairbairn called SwiftyMarkdown. It helps us translate Swift Strings containing Markdown into NSAttributedStrings. Let's take a look.
letmd=SwiftyMarkdown(string:"# SwiftyMarkdown\nConverts *Markdown* files and strings into NSAttributedString")md.attributedString()
It's that simple! SwiftyMarkdown will use some defaults for fonts, colors, etc. Customizing those is quite simple:
UISegmentedControl is great, but it's not animated, and has limits to how much you can customize it. UISwitch is great too, it is animated, but it's limited to a yes/no choice, and customization again can be quite tricky. Today we'll look at a library from George Marmaridis called BetterSegmentedControl that aims to helps us here.
Creating good-looking animations can be a lot of work. We could spend our whole day learning about curves and scaling, and transforms, and oh boy...
Instead, what if we could simply apply some popular animations to our UI elements with almost no effort at all? Today we'll check out a library called Spring that allows us to do just that.
Spring supplies a ton of common animations like shake, pop, squeeze, wobble, etc.
If we're using Interface Builder, we actually don't even need any code at all. We just use one of Spring'sUIView-subclasses, then we supply our animation by name.
In code, it's equally simple:
layer.animation="shake"layer.animate()
These all work great out of the box, but we can still customize the curve or individual properties if needed. Neat!
More info about Spring can be found at git.io/spring
Our apps can do tons of useful things with users' data. Before we can though, we must always ask for their permission. Whether it's their physical location, photos, or contacts, the user is always in control of when and how we can access their data.
Each of these respective APIs has it's own way of asking the user if they will allow us to access the data within.
Today we'll check out a library called Permission that unifies all of these permission request into one beautiful API. Let's dive in.
We begin by declaring which piece of data we'd like access to:
letpermission:Permission=.Photos
At this point, permission.status will report .NotDetermined (as we'd expect). Next we'll request the permission, this is what causes the prompt to be presented to the user:
Permission is smart. If we request access to something the user has already said ‘no' to, it will present an alert (with customizable title/message/buttons) that allows the user to jump to the part of Settings.app needed to flip the switch back to ‘yes'.
Additionally, Permission also provides a PermissionSet type to do this on groups of permissions (i.e. Contacts + Camera + Photos).
There's also a PermissionButton (a UIButton subclass) that can display the current permission state, and prompt when tapped.