Push Notifications were a fantastic addition to iOS in iOS 3. They can also sometimes be tricky to test and debug. We can save ourselves a ton of time and hassle with OS Xapp called Knuff. Today we'll check it out and see what it can do. Let's get started.
Before we begin, we'll install the free Knuff iOS app to make our lives a little easier in a few minutes.
We'll launch it on our iOS device (on the same Wifi network as our Mac). Knuff will display a new Devices button for us to choose our device, then it will in our push token for us.
We can use the Knuff iOS tab to try a push right away, neat!
Next, we'll switch to the Custom tab where we'll pick our app's certificate identity:
Knuff helps us by finding all the identities in our Keychain and letting us pick. (We can create a new push certificate/identity for our app with one command using fastlane's pem tool).
That's it! We can now use Knuff to configure our payload, and send pushes. Knuff even lets us save our configurations into files that we can open later for testing different notifications and scenarios.
More info about Knuff can be found at git.io/knuff
It's another fastlane Friday! Today we're looking at frameit, an awesome fastlane tool that helps us take our screenshots to the next level. We can display our screenshots on devices, and even add some marketing text. Let's dive in.
We'll start by installing frameit:
gem install frameit
Next we'll need to perform some initial setup. We'll head into our project's directory and run frameit to kick things off:
frameit will guide us through downloading the high quality frame images from Apple's marketing site and moving them into place.
Now, we can run frameit anytime to find all screenshot files and create versions of them placed inside device frames. Neat!
As with most fastlane tools, we can create a Framefile.json where we can configure things like texts, fonts, etc. frameit even lets us use .strings files so everything is easily localized!
frameit also supports all of this for OS X apps as well!
In Bite #147 we looked at installing Xcode Plugins using the Alcatraz Package Manager. Today we'll look at a few plugins we can install that will make the experience of writing code in Xcodemuch better. Let's get started.
First up is Fuzzy Autocomplete. In Bite #146, we covered using Xcode's "Quick Open" dialog. It has this great "fuzzy matching" feature where (for example) we can type something like "upvc" and it will match UserProfileViewController.swift. This plugin brings that exact same functionality to Xcode's autocomplete:
Next, a simple one. Normally when we press ⌘← in Xcode, it jumps all the way to the very beginning of the line. The Xcode Beginning of Lineplugin alters this, and instead jumps to the first character of code. Neat!
The QuickJumpplugin is super fun. We can activate it with a keyboard shortcut, then it will display a bunch of characters, we type the one where we want our cursor to move and we're there!
Refactorator let us rename functions, vars, enums etc. in Swift!
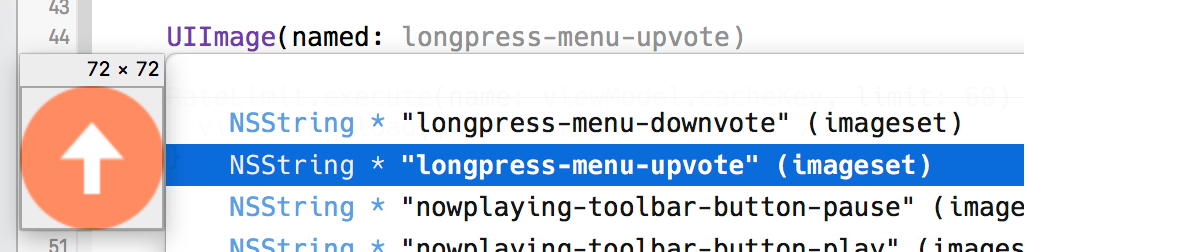
Finally, with the KSImageNamed plugin, Xcode will autocomplete names of images, when calling functions like UIImage(named:):
All of the plugins mentioned here are available in Alcatraz.
Style is important when writing code. Following conventions and guidelines helps tell the story of our code to our team and our future-selves. Today we'll learn about SwiftLint, a tool from Realm that can help us enforce Swift conventions and best practices. Let's get started.
SwiftLint provides a downloadable install package on its Github page, but here we'll install using Homebrew. We'll run:
brew install swiftlint
Now, we can run swiftlint rules at the command line to see all the different convetions and standards that will be enforced. We can also run swiftlint lint in the root directory of our project to see what rules we're breaking right in the terminal.
Our next step is to add SwiftLint as a build phase to our project.
We'll head over to our project's settings, then to the Build Phases tab. We'll click the + button to add a** new “Run Script” phase**. We'll name it “SwiftLint” and give it the follow script content:
if which swiftlint > /dev/null; then
  swiftlint
else
  echo “Download SwiftLint: https://github.com/realm/SwiftLint"
fi
Now when we build our project, SwiftLint will let us know via regular Errors and Warnings in Xcode when there's something to fix.
We can configure how SwiftLint behaves in complete detail by creating a new file called .swiftlint.yml and putting it in the root directory of our project. We can fill out this file to customize (for example) which conventions are enforced:
disabled_rules:-colon-control_statement
We can disable rules “in-line” in our code with special comments:
// swiftlint:disable colonletnoWarning:String=""// No warning about colon placement// swiftlint:enable colonletyesWarning:String=""// Warning generated
Finally, SwiftLint can correct some violations (trailing_newline, trailing_semicolon, etc.). Just run swiftlint autocorrect.
Today we'll look at Behaviors in Xcode. Behaviors are a way for us to tell Xcode“whenever this specific thing happens, I want this other specific thing (or set of things) to happen automatically.” Let's get started.
We'll start by opening Xcode'spreferences (Xcode > Preferences) or ⌘, and heading to the Behaviors tab:
In the sidebar on the left we'll find a list of events that can occur in Xcode. We can trigger something to happen off of any of these events.
On the right of the Behaviors tab, we can choose what actions we'd like triggered when the selected event occurs. We can select as many of these as we'd like and they'll all happen, like magic 🎩, each time the selected event occurs.
Let's start simple and play a sound each time a build fails. We'll select the appropriate item in the sidebar, then enable the “Play sound” checkbox.
Xcode uses Behaviors itself. For example, when an error is found, it shows the issue navigator. When our app finishes building, it shows the familiar “Build Succeeded” bezel. When our apps begins running it shows the debugger. (All things that, since we now know about Behaviors, we can customize).
There's a ton of power packed into Behaviors, and it's all quite simple to configure. We can hide/show different panels, jump to specific spots in Xcode's interface, even run a custom script. Try to examine the little things you find yourself doing in Xcode (hiding a panel, going over to the build log, etc.) maybe a Behavior could save you the trouble!
Xcode is an incredible piece of software with tons of great features. There's always room for improvement, though. Today we'll look at Alcatraz.
It's a plugin for Xcode that lets us install otherplugins for Xcode. (Also themes and templates). Let's get started.
We'll begin by installing Alcatraz. We can find an install command ready for us to copy and paste to our terminal on alcatraz.io.
We'll quit Xcode, then run this to install Acatraz into Xcode:
curl -fsSL https://raw.githubusercontent.com/supermarin/Alcatraz/deploy/Scripts/install.sh | sh
Then, we'll re-launch Xcode. We'll now see a new menu: Window > Package Manager (or ⌘⇧9).
Now, we can simple browse through the available plugins, and click to install we'd like. After installing anything, we'll need to restart Xcode to see its effect. Let's test it out now!
One incredibly simple feature missing from Xcode is the ability to quickly change the font size with ⌘+ and ⌘-.
We'll scroll down to the AdjustFontSize plugin and click Install.
We'll restart Xcode then open a project and try it out. Success! Try installing a theme or some templates next!
More info about Alcatraz can be found at alcatraz.io
We spend a lot of our time in Xcode. It's a huge app with tons of different panels and views to explore.
Today we'll look at some of the most helpful keyboard shortcuts in Xcode and how they can help us navigate around Xcode's interface more quickly and efficiently. Let's dive in.
Xcode's keyboard shortcuts can be tricky to learn (there's quite a few), but they are actually very intuitive (and usually guessable).
We can open any of the panes in the navigator area with ⌘1-7. We can toggle the whole navigator open and closed by pressing ⌘0.
We can do the same with the utility area (right side) using ⌘⌥1-7 and ⌘⌥0.
We can focus in the filter bar of the current pane with ⌘⌥J.
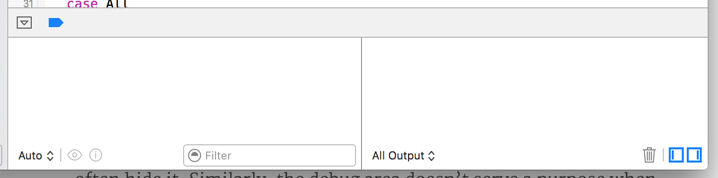
We can toggle the debug area with ⌘⇧Y, toggle breaking at breakpoints with ⌘Y. We can also pause/continue execute with ⌃⌘Y.
⌘-click symbols to navigate to them.
One of Xcode's most powerful keyboard shortcuts is ⌘⇧O. This displays a Quick Open panel that certainly lives up to its name. Navigate with the arrow keys, then press ↩︎ to open a file.
Hold down ⌥ when opening a file from this panel to open it side-by-side in the assistant editor. Then toggle the assistant with ⌘↩︎ and ⌘⌥↩︎.
Code Signing. The very mention of certificates or provisioningprofiles can send chills up an iOS engineer's spine.
We've all been there. Just finished up a great first pass at a new feature, or finally ready to submit to the App Store and BAM! We're stopped in our tracks by a confusing error related to code signing.
Today's fastlane Friday is a big one. Yesterday, a new fastlane tool launched. It's called match, and it fixes code signing. Yes, really. Let's do this. 🚀
Most iOS teams have separate code signing identities for each member. This means most iOS teams have tons of provisioning profiles, probably lots of duplicates, invalid ones, etc.
Adding new devices or renewing certificates can be a huge hassle, and only makes on boarding new team members slower.
With match, we can avoid these issues entirely. match allows us to share one single code signing identity across our development team.
We keep this single identity (and it's associated provision profiles) in one central location.
match automatically syncs our iOS keys and profiles using a simple git repository. It handles everything (i.e. creating certificates and profiles), while we retain complete control.
Let's setup match for a project. We'll start by creating a new Github repository to hold our certificates, profiles, etc.
We'll call it certificates and make absolutely sure it's set to be private!
Next, we'll go into our project's main directory and run:
match init
We'll be asked for the URL of the repository we created earlier, then a Matchfile will be created to hold a few settings.
Next we'll run:
match development
match will create a new certificate and provisioning profile, and store them in our Github repo. They'll all be encrypted using openssl! 🔐
In the future, when we get a new machine for example, we will only need to run that one command to pull down everything and install it all locally. Incredible. Setting up new machines or team members has never been easier (or faster 🚗💨)!
This is only a small taste of how helpful match can be! Check out the incredibly well done complete guide that covers everything from start to finish at codesigning.guide
It's another fastlane Friday! Last week in Bite #135, we covered how to install and setup fastlane and an initial Fastfile. Today we'll look at how we can take our fastlane skills to the next level and customize our Fastfile using actions. Let's get started.
We briefly mentioned fastlaneactions in Bite #135. Let's start by taking a closer look at them.
Actions are essentially build "steps". fastlane organizes these build steps into sets called lanes. Each action is responsible for a very specific part of the lane's larger task.
Let's add an action to a lane:
lane:betadoincrement_build_numbersighgympilotend
By simply adding the increment_build_numberaction, we'll never need to manually bump our build number again!
We can install dependencies with actions like carthage and cocoapods. We can deploy with the pilot and deliveractions, or use hockey and crashlytics to upload to those services.
We can notify teammates with slack or archive each release with github_release.
We can even define lanes to bootstrap our dev environment using actions like install_xcode_plugin or dotgpg_environment.
We can "shell out" to a truly custom build script as well:
sh"./script.sh"
Simply put, actions are how to get the most out of fastlane. If we're doing something each time we build or deploy, there's a good chance a fastlane already has an action for it.
If not, we can make our own. Just like the Fastfile itself, actions are written in Ruby. We can generate a new one with:
fastlane new_action
Detailed documentation on all actions is available, and we can check out the full list of 120+ actions with:
It's another fastlane Friday here on LBOC! We've covered a few of the individual fastlane tools so far, but today we'll look at fastlane itself. It gives us a single command that brings together all the various tools in the suite like gym, snapshot, deliver, etc into one streamlined workflow. Let's get started.
We can of course continue to use each of the fastlane tools individually, but using fastlane allows us to use just one tool that connects not only each of the tools in the suite, but also integrates with other third-party tools like CocoaPods and xctool.
fastlane provides a fantastic in-depth Getting Started guide, but to get things going quickly here's the basics:
We'll begin by installing fastlane, this will install all the fastlane tools, including all the ones we've covered here, wrapped into one simple tool.
gem install fastlane
Then, we'll simply run fastlane init in the root directory of our project.
fastlane's setup assistant will ask us a few questions about our app, then it will create all the configuration files for us, where we'll be able to customize each the tools default settings as well as define our “lanes”.
After completing the intial setup process, we can start to customize our new Fastfile (which was created for us automatically). fastlane is built around the concept of “lanes”. Here's one that deploys to the App Store:
We can run all of these tools now, each one after another by simply running fastlane appstore. Nice!
Notice commands like cocoapods and slack are here. These are some of the third-party actions mentioned earlier.
This is where fastlane's awesome community really shines. There's already 120+ actions ready to use for services like s3, slack and crashlytics, as well as commands for things such as bumping the build number, or even collecting input from the user. Neat!